This post may contain affiliate links. Please see our disclosure policy.
Learn how to make a beginners soap recipe with pictures and video. This easy-to-follow soap recipe includes step-by-step instructions, making it perfect for first-timers who are ready to delve into cold-process soap-making.

When I first started making cold process soaps, I wanted to find a beginner’s soap recipe that would make the whole soap-making process easy and fun. Over the years, I’ve made tons of soap, and I’ve honed in on the best ways to get amazing results while keeping things extremely simple.
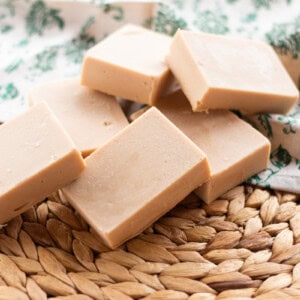
This recipe is very easy to follow and uses only seven ingredients. It’s great for beginners new to the cold process method.
How to make soap for beginners
Let’s walk through this step-by-step. Don’t worry; even if this is your first time making cold-process soap, this is a basic recipe, and you’ll do great!
This recipe is made with 5% superfat. I also ran the ingredients through this soap calculator. Any adjustment made to the recipe, besides the fragrance, will need to be recalculated.
What you’ll need:
Oils and Fats:
- Lard: 8 oz (cheaper to get locally than online)
- Shea Butter 5 oz
- Coconut Oil 2 oz
- Castor Oil 1 oz
Liquid and Lye
- Water 6.08 oz
- Lye 2.15 oz
Fragrance
- Vanilla bean fragrance oil 1.0 oz (optional)
Equipment
- Small saucepan or double boiler
- Heat-resistant glass jar or container
- Immersion blender
- Soap molds (these are my favorite)
- Protective gear (gloves, goggles, long-sleeved shirt)
- Digital thermometer
- Digital scale
- Non-reactive stirring utensil
- Vinegar (for neutralizing lye, in case of spills)
Instructions:
Step 1: Melting Oils and Fats
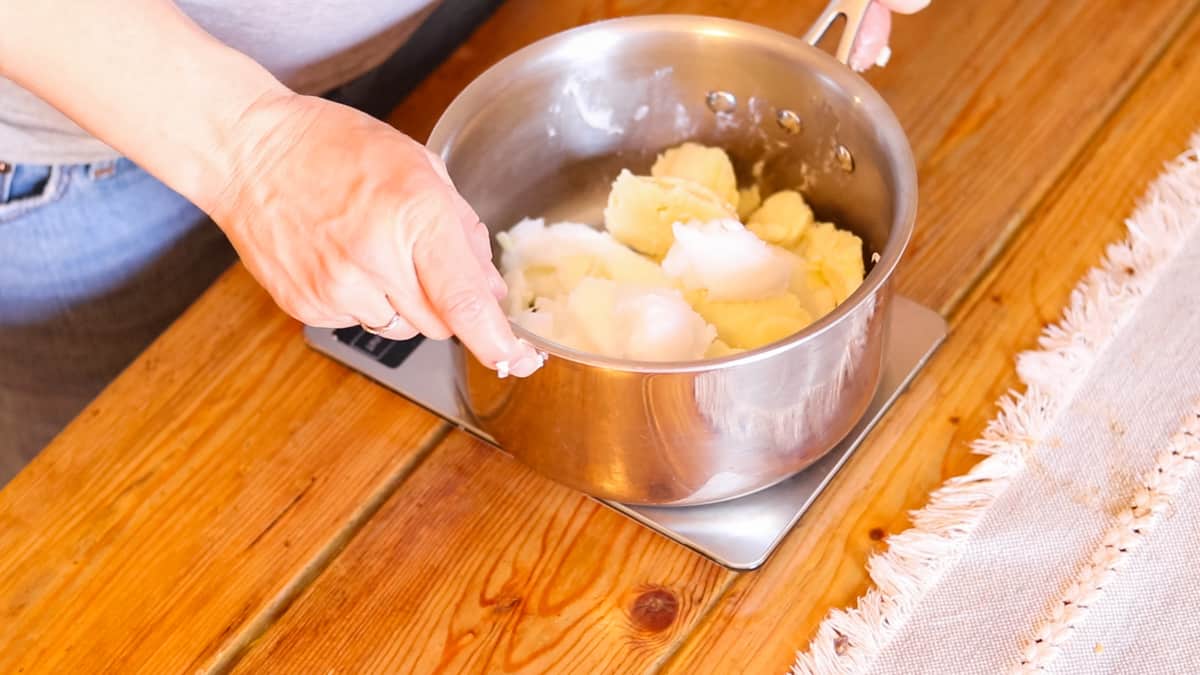
- Use a digital scale to weigh out the lard, shea butter, coconut oil, and castor oil, then add them to a small saucepan or double boiler.
- Gently heat the mixture on a low heat setting until fully melted, then remove from heat.
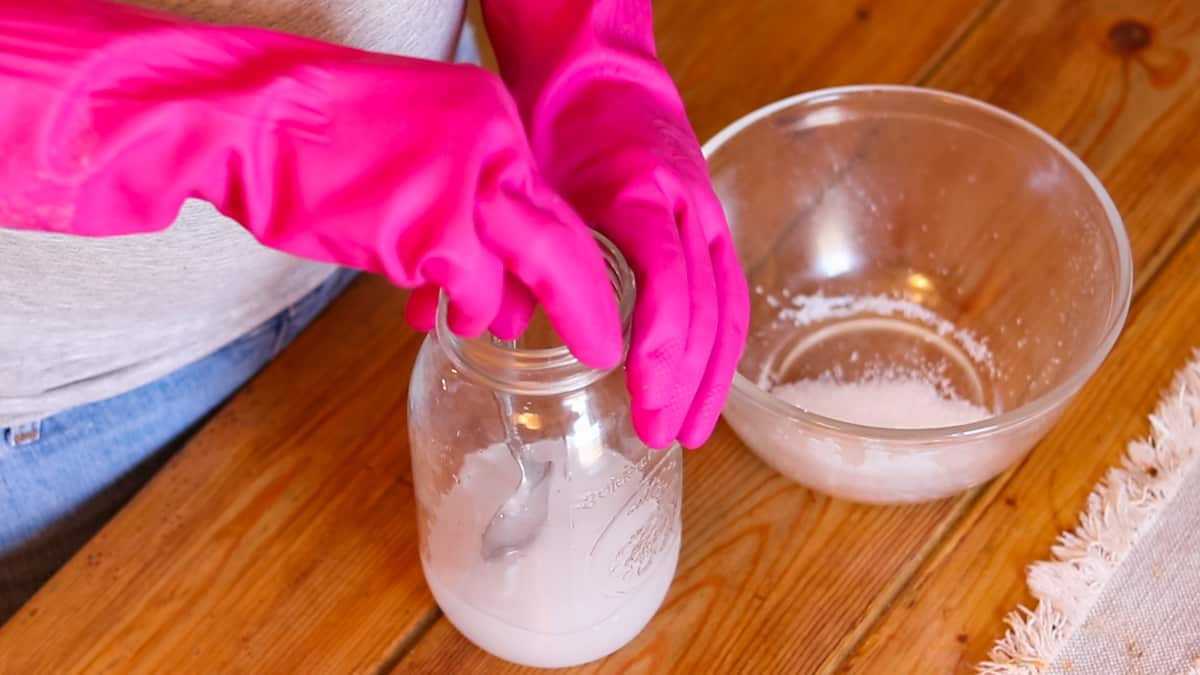
Step 2: Prepare your Lye Solution
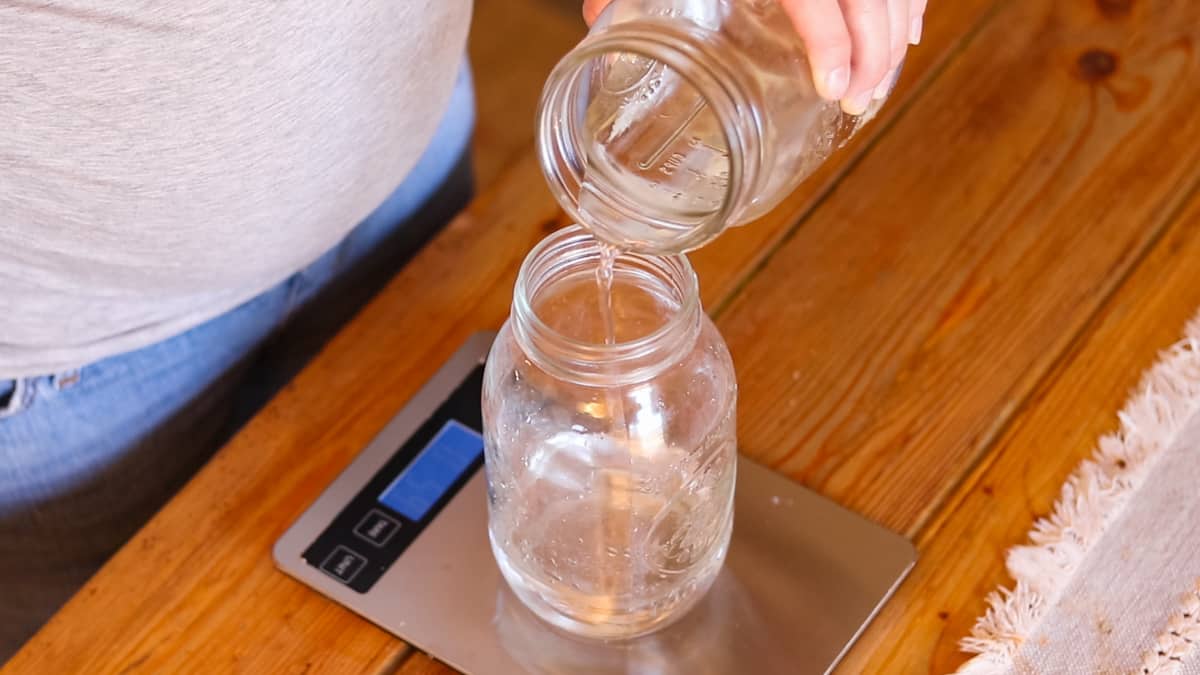
- Measure the water into the heat-resistant jar.
- Wearing protective gear, gradually add the lye to the water, stirring continuously with a non-reactive utensil as you do so. Never add water to the lye; the safe order is to gently add the lye to the water.
- Be aware that the solution will heat up quickly and emit toxic fumes. Mix until fully dissolved, then set aside in a safe area to cool.
Step 3: Combining Ingredients
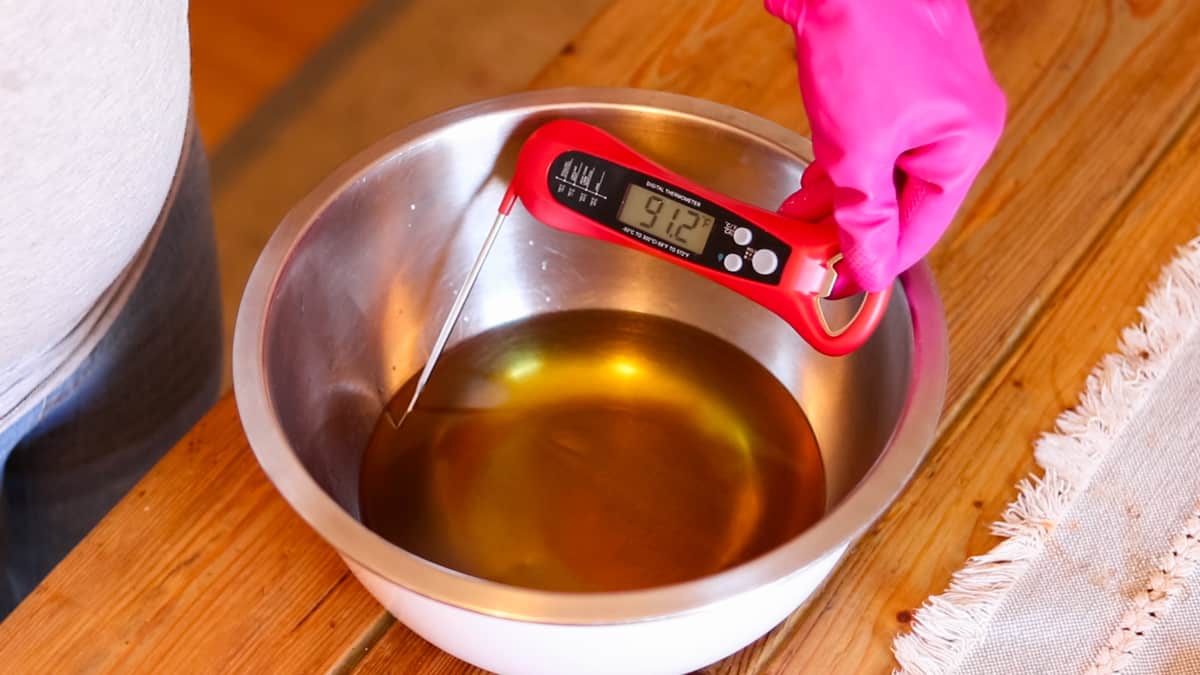
- Cool both the oils and lye solution to approximately 100°F. Aim for both to be within 10 degrees of each other.
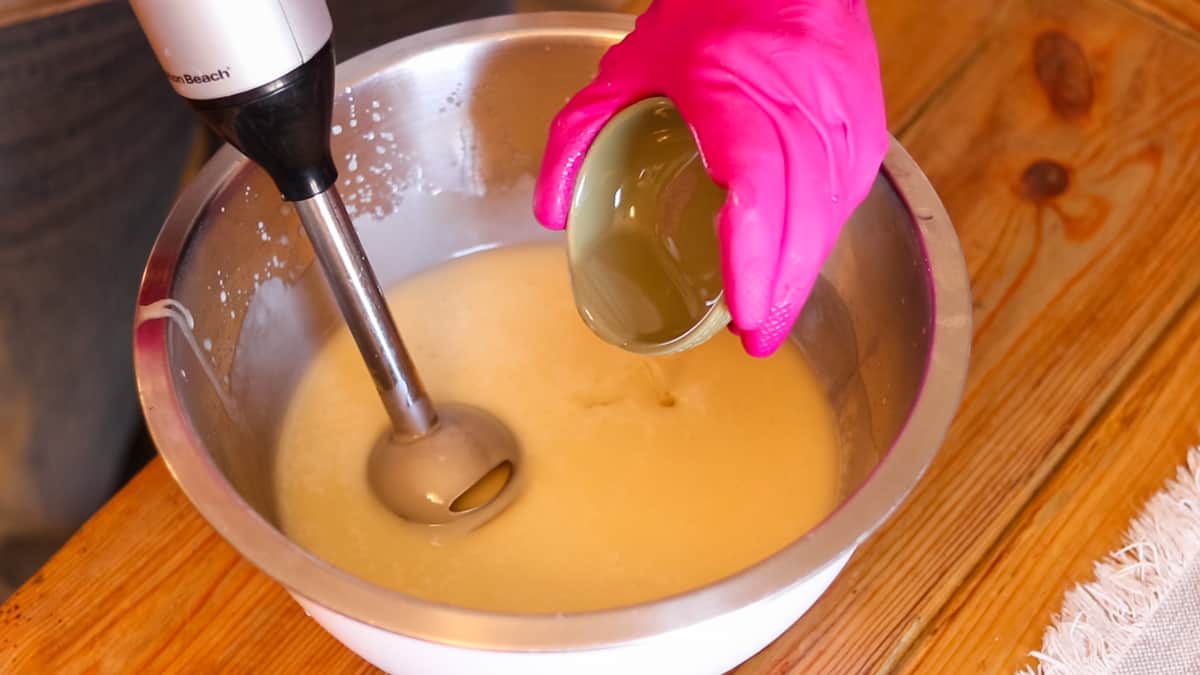
- Slowly add about a quarter of the lye solution to the melted oil mixture and then blending with an immersion blender.
- Continue adding the lye solution gradually until all of it is incorporated and the soap mixture reaches a light trace. (More details in the trace section below)
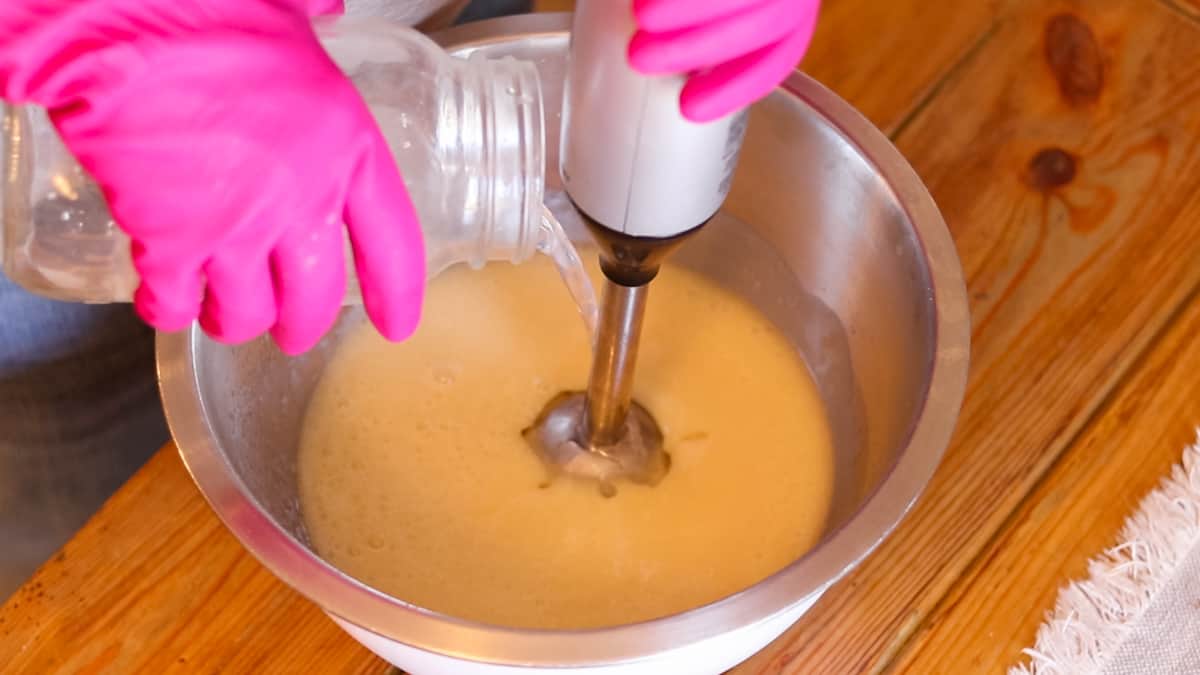
Step 4: Adding Fragrance
- Add the fragrance oil to the soap mixture. I use fragrance oil in this recipe to make it easy, but normally, I’ll use essential oils.
- Continue to mix until the soap reaches a medium trace consistency. (refer to picture)
Step 5: Transferring to the Molds
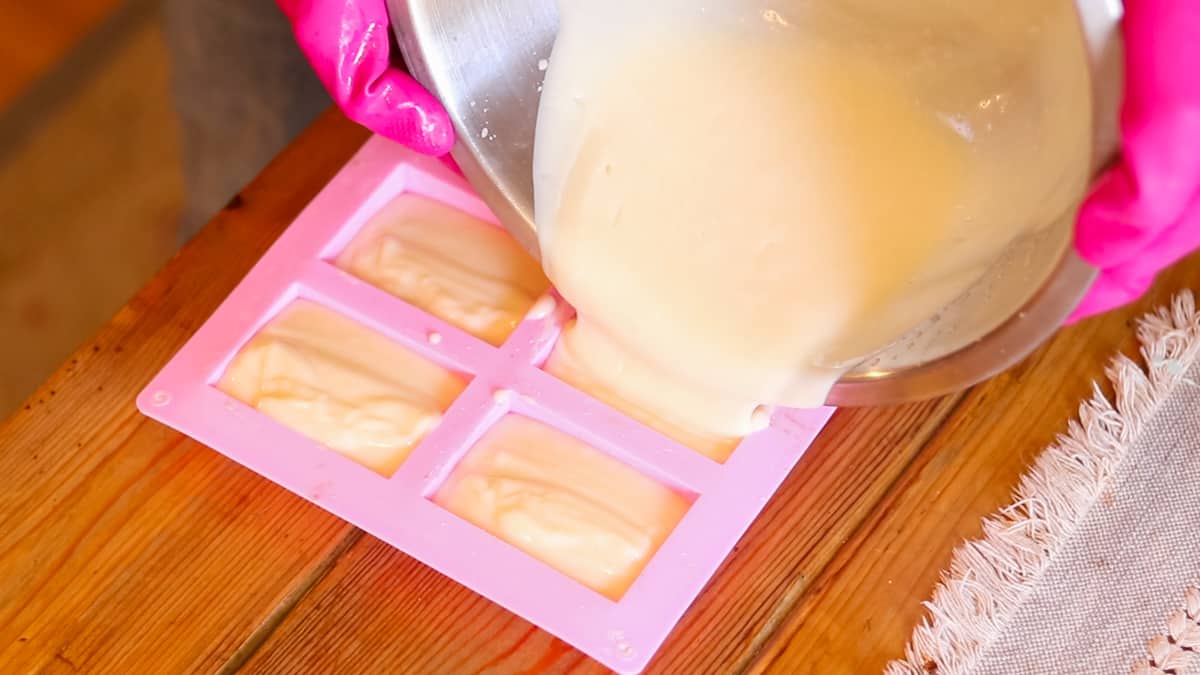
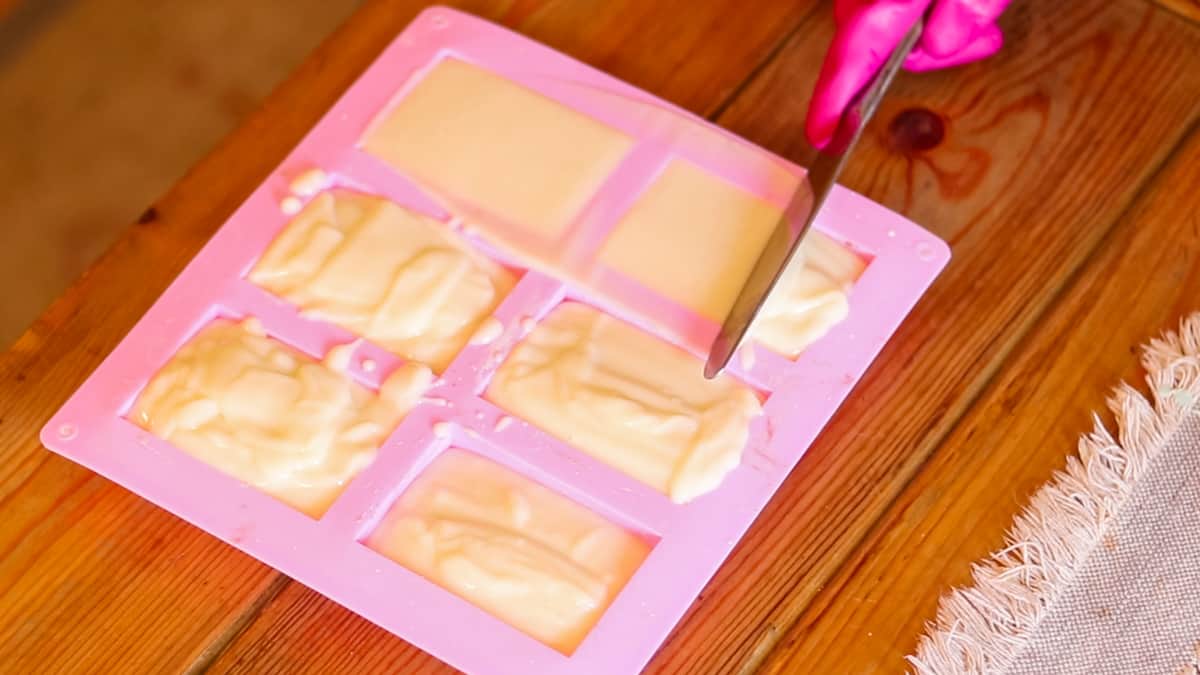
- Pour the mixed soap batter into your prepared molds.
- Use a butter knife to level off the tops for a smooth finish.
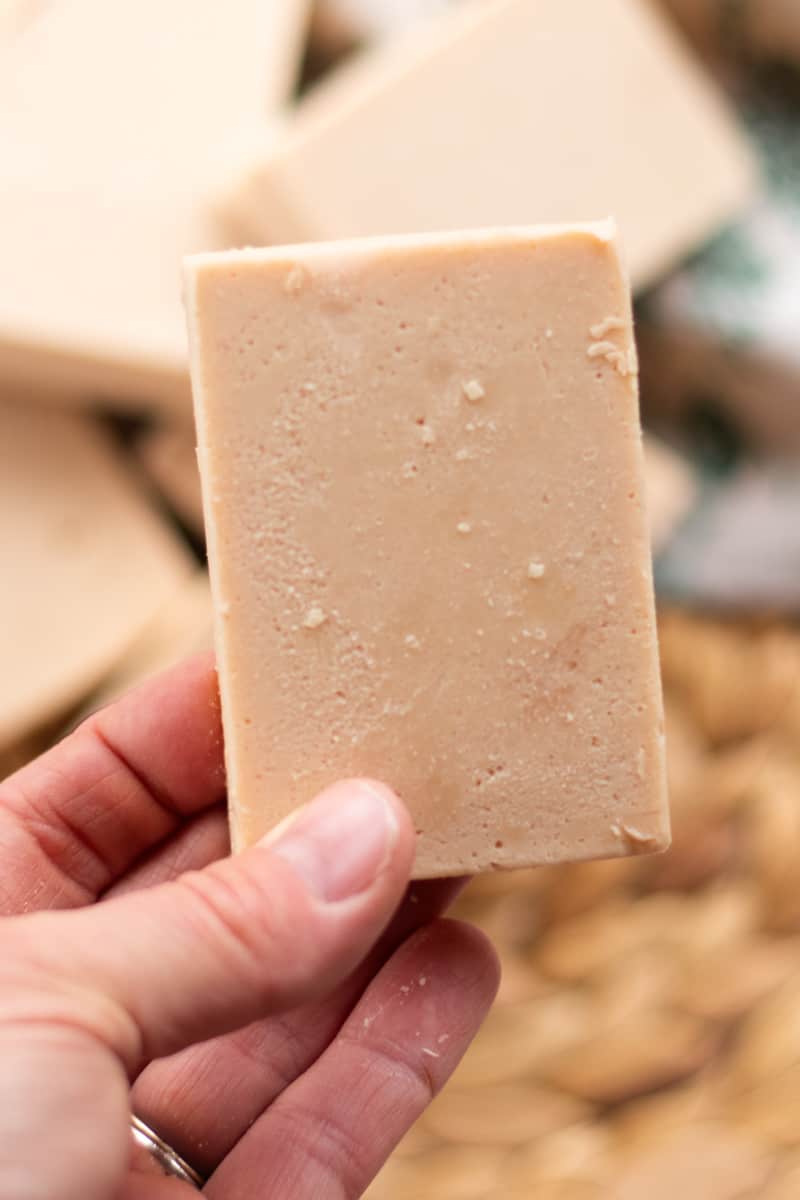
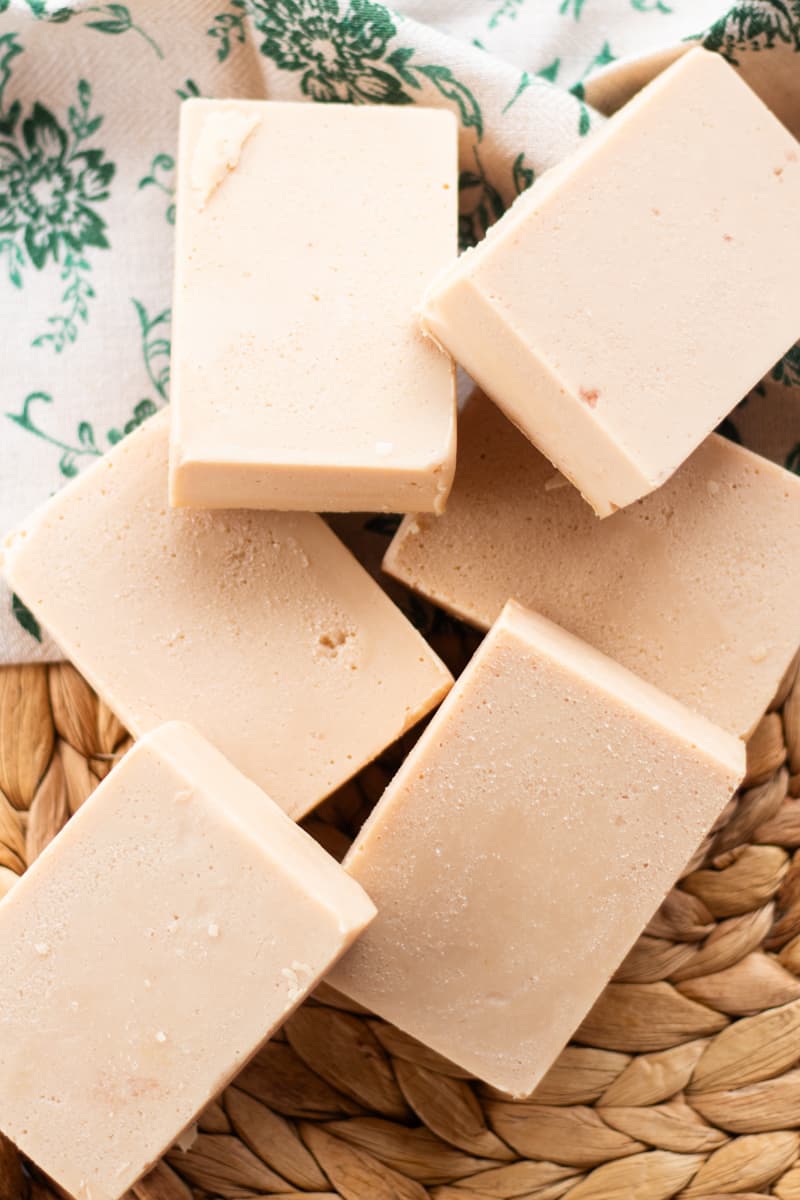
Step 6: Curing
- Allow the soap to set in the molds for 24 hours or until hardened.
- Once hard, remove the soap from the molds and set them on their ends to cure.
- Leave the soap to cure for 5-6 weeks before using.
Note: This recipe yields approximately 6 soap bars with the specified mold size.
Safety with cold process soap
- Always wear protective gear — gloves, goggles, and a long-sleeved shirt — during the soap-making process.
- Work in a well-ventilated space to prevent a buildup of fumes.
- Ensure there are no children or pets in the area.
- Never pour water into the lye — always add the lye to the water.
- Handle lye carefully to avoid burns; use heat-resistant, non-reactive containers and utensils.
- If lye contacts the skin or eyes, rinse immediately with running water and seek medical help.
- Label all materials, clean up spills promptly, and dispose of chemicals responsibly.
Tips
- A great tip I learned from another soap crafter to help remember the proper order of mixing up the lye solution is to think of the lye as snow falling on a lake of water. Lye goes into the water, not the other way around.
- Always use a soap calculator. Any adjustments made besides the fragrance will have to be run through a soap calculator first. If you swap out any oils or fats, you’ll want to make sure you use the proper weights of each. A soap calculator will help you do this safely.
- Measure in weight, not by volume. This is the most accurate method, and I always recommend using a digital scale.
- This recipe uses fragrance oil at 4.5%, which is a medium scent.
What are the different types of soap bars?
If you are new to soap making, you may have heard of some different types of soaps: melt and pour, like this melt and pour coconut oil soap; cold process, like this lard soap recipe; and hot process soap bars. These are the three main types, and there are a few differences between them.
Melt and pour soaps are ready-made soap bases.
They simply need to be melted. You don’t have to use lye because the manufacturers have already taken care of that step.
After melting the base, add-ins such as essential oils for scent or dyes for coloring can be added to the mixture. Then, the melted soap is poured into a mold and left to harden.
One of the big differences between melt and pour soaps and the others is that melt and pour soap has already gone through the saponification process.
This means it can be used as soon as it is done hardening and it doesn’t require the curing process.
What about cold process soaps?
Cold process and hot process soaps are made by mixing a lye solution with a combination of oils and fats. The main difference between cold process and hot process is the application of heat.
Cold process, as the name implies, does not use external heat application during the creation of the soap.
You simply mix up your lye solution, add it to the melted oils and fats, use an immersion blender to emulsify them together, and then pour the batter into your soap mold.
Once they are in the mold, they go through the saponification process. This chemical reaction takes place about 24 to 48 hours after pouring into the molds, turning your soap ingredients into actual soap.
This process produces heat, but with cold-process soap, all the heating is going on inside the soap bar.
Hot process soap making
Hot process soap, on the other hand, involves heating the lye solution and oils in something like a crock pot, which speeds up the saponification process.
This allows the hot process soap to be used as soon as it hardens, unlike the cold process soap, which needs to cure for 6 weeks.
Though you can safely use hot process soap bars as soon as they come out of the molds, it is still recommended to cure them because the bars will hold up better.
All three types of soap-making options will yield high-quality soap bars that you can be proud of. Melt and pour soaps are nice for people who would prefer not to handle lye.
Cold process soaps produce the best-looking bars, and hot process soaps are great for maximum scent retention. I have recipes for all types, so you’ll be able to find the perfect recipe to suit your needs.
What is superfat in soap?
Superfat in soap making is the addition of excess oils and fats that create a buffer of unsaponified oils, ensuring no lye is left in the bar after the saponification process.
To put it simply, our superfat is extra oil that won’t be turned into soap. This helps to make the soap milder and more gentle on the skin.
Every soap recipe that uses lye needs to have enough oil and fat content to use up all the lye in the saponification process.
If you don’t use enough oils and fats in your recipe, there could be excess lye in the soap, which we don’t want. We want a bar of soap with no lye remaining and a little bit of “superfat” (extra oil or fat).
What to know about trace
When oils and lye water are combined with a stick blender, the two ingredients start to combine.
However, if you only mix a little bit, you’ll still notice streaks of oil present in the liquid. We need to keep mixing to totally emulsify the ingredients, or else the soap will separate in the mold.
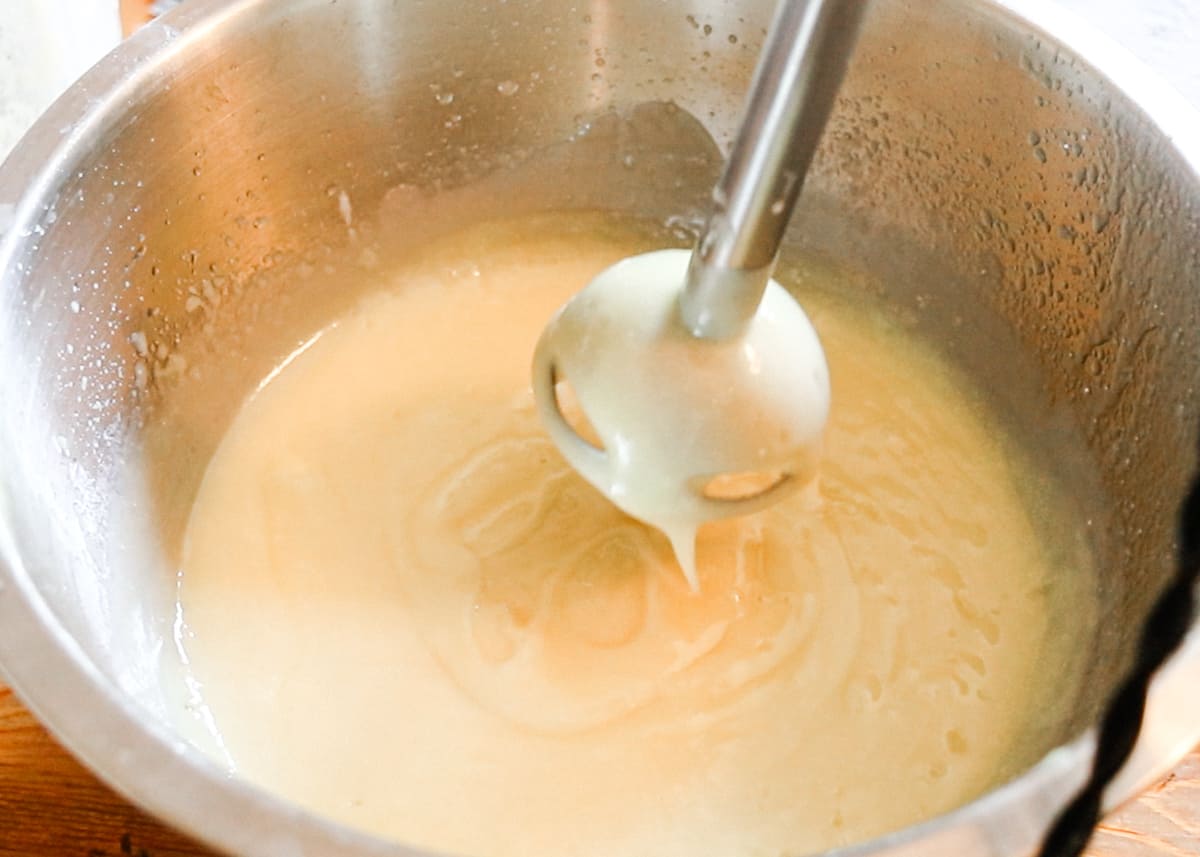
After about 60 seconds, the mixture will turn a solid, creamy color with a consistency similar to a thin cake batter. Once this happens, you know you’ve reached light trace, and the saponification process gets going.
Trace is just the word used to refer to the thickness of the soap batter. If you mix longer, it’ll get thicker, developing into a medium and then finally a heavy trace.
Recipes may call for a light, medium, or heavy trace, depending on the goal for the finished product.
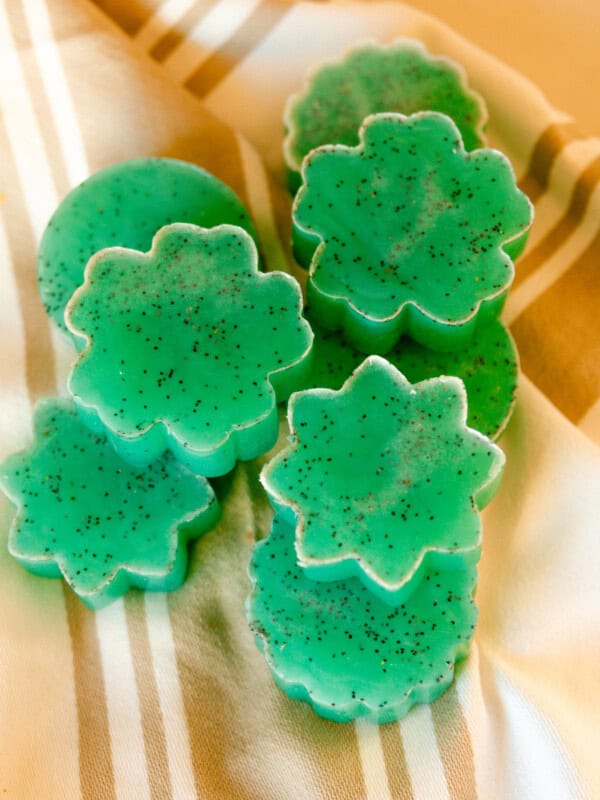
I used a medium trace for this recipe (see photo in the instructions section above), but here is a photo of a heavy trace so you can see what it looks like. Notice the consistency is more like a thick pudding.
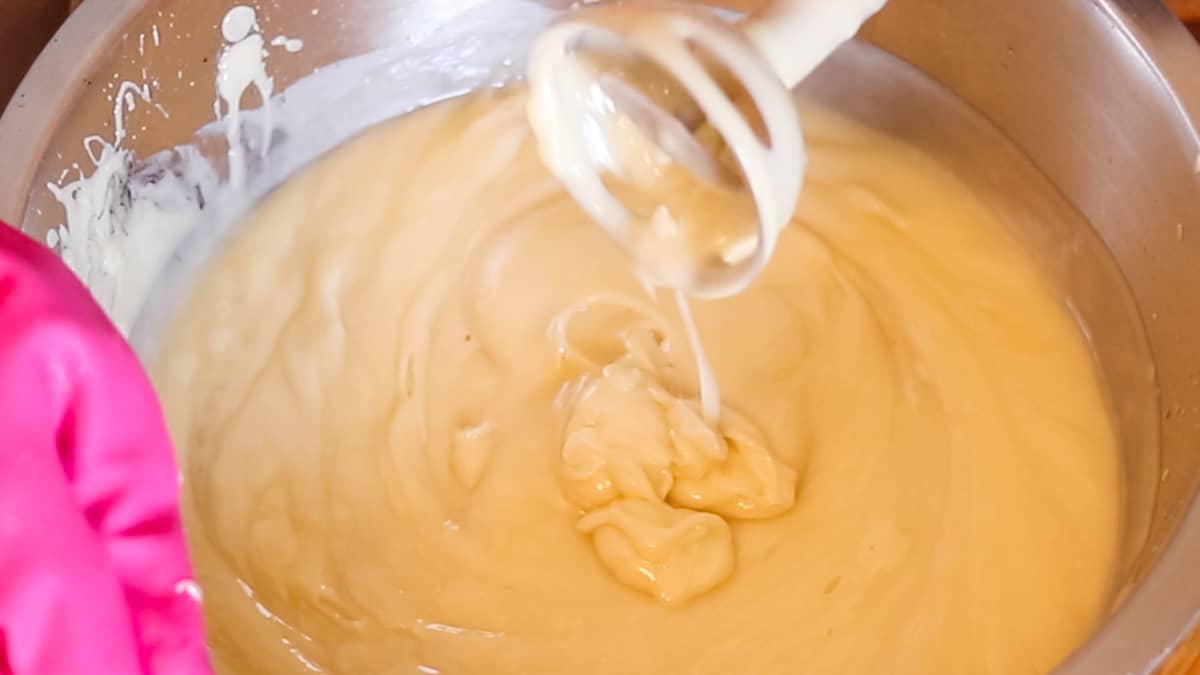
With a light trace, you can do detailed swirl designs; a medium trace is good for add-ins like poppy seeds; a thick trace can be whipped easily.
Key takeaways
Cold process soap making is a fun and exciting craft that even beginners can master in a short time. Here are some more great homemade soap recipes to try:
- Lemon-scented coconut milk soap recipe
- How to make herbal soap with dried herbs
- Sea salt soap bar recipe
- You can also try this melt and pour soap recipe for beginners.
- How to make whipped soap
Soap For Beginners
Equipment
- saucepan or double boiler
- Heat-resistant glass jar or container
- soap molds I love these silicone molds
- Protective gear (gloves, goggles, long-sleeved shirt)
- Non-reactive stirring utensil
- Vinegar for neutralizing lye, in case of spills
Ingredients
- 8 oz Lard
- 5 oz Shea butter
- 2 oz Coconut oil
- 1 oz Castor oil
- 6.08 oz Water
- 2.15 oz Lye
- 1 oz Vanilla bean fragrance oil, optional
Instructions
- Use a digital scale to weigh the lard, shea butter, coconut oil, and castor oil, then add them to a small saucepan or double boiler.
- Heat the mixture over low heat until fully melted then remove from heat.
- Measure the water into the heat-resistant jar.
- Wearing protective gear, gradually add the lye to the water, stirring continuously with a non-reactive utensil until dissolved. Be cautious as the lye will heat up fast and emit toxic fumes. Set aside in a safe location to cool.
- Cool both the oils and lye solution to approximately 100°F. Aim for both to be within 10 degrees of each other.
- Slowly add about a quarter of the lye solution to the melted oil mixture and blend with an immersion blender. Continue adding the lye solution gradually until all of it is incorporated and the soap mixture reaches a light trace. (see step by step pics above)
- Add the fragrance oil to the soap mixture. Mix until you reach medium trace.
- Pour batter into molds. Use a butter knife to level off the tops for a smooth finish.
- Allow the soap to set in the molds for 24 hours or until hardened. Once hard, remove the soap from the molds and set them on their ends to cure.
- Leave the soap to cure for 5-6 weeks before using.


I was introduced to Laura’s blog from her sister’s podcast, and I got the soap-making bug while listening to one of their old Q&A sessions. I’m so glad I found this blog and YouTube channel; I’ve used this recipe twice now, and I’m really excited to try more. I really appreciate the clear, detailed instructions and all the information available on this blog.
I am so happy you found the instructions helpful!
In this recipe, could lard be interchangeable with tallow?
Hi, yes, but you will need to imput the amounts into the soap calculator again to get your measurements for water and lye!
Is there another oil I can use to replace the lard?
Just wondering how many of these molds I need for this recipe.. thank you
Hi Laura,
Would I be able to double this recipe without having to recaclulate anything? So just weigh out everything twice. I have a long brick soap mold and would need more of the mixture to fill it up.
Hi Laura ! What would a non-reactive utensil be made of ? I can’t make sense of what Google says. Thanks !
Hi Claire! Stainless steel would be non-reactive