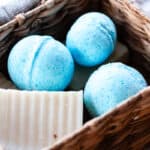
Homemade Shower Bombs
Elevate your shower with homemade shower bombs! Dive into the recipe below.
Servings: 3 shower bombs
Equipment
Ingredients
- ½ cup 5 oz of baking soda
- ¼ cup 2.2 oz of citric acid
- ¼ cup 2.2 oz of Epsom salts
- 20 drops of lime essential oil
- 20 drops of helichrysum essential oil
- 10 drops of liquid food coloring adjust amount as needed
- Witch hazel just a few spritzes as needed
Instructions
- Mix all the dry ingredients together in a medium-sized bowl.
- For these next steps, work quickly, as the liquid will start to fizz when added.
- Quickly add your essential oils and liquid colorant. Mix with your hands or a whisk until well incorporated.
- At this point, you want the shower bomb to resemble kinetic sand. If it still feels crumbly, add a few extra spritzes of witch hazel. Then, mix again with your hands until you get the right consistency.
- Next, prepare your bath bomb molds by greasing them with a trace of oil. (I used castor oil, but any oil will do.)
- Add the mixture to both sides of the bath bomb molds and firmly press the two halves together. Wipe any excess mixture off the sides and set it aside to firm up.
- Allow the molds to sit for 24-48 hours or until completely dry, and then pop the shower bombs out of the molds. They are ready to use once hard.
Notes
Scroll up for Step by Step Pictures.
You’ll want to overflow each half of the mold with the shower bomb mixture so that it really compresses when you squeeze the two halves together.
For metal molds, you will likely need to tap the sides of the mold with a spoon or butter knife to help get the shower bombs to release.
Try not to overdo the liquid! If your mold starts expanding right away when you add the mixture, it means it’s probably too wet to begin with.
If the mixture is too dry, it will not hold its shape, so add an extra spritz of witch hazel as needed.
The shower bomb mixture should hold its shape when you squeeze the ingredients together, but not too much so that it becomes stiff.
My shower bomb recipe doesn’t contain oil, so the shower floor shouldn’t be slippery after use, although it’s always best to be extra cautious and rinse the shower floor after use.